Wednesday, December 16, 2015

How to enable radio button custom validation in Nintex Form e.g. one selection among two groups of radio buttons

Recently I had to achieve custom validation for Radio button option selection among two groups of radio buttons on a Nintex Form and soon realized that radio button custom validation is not straight forward in Nintex. For example if there is a requirement to select only one option among two radio button groups or as soon as user selects one option in one group the second already selected option in other group gets cleared automatically.

So thought of writing a post that helps to explain the rendering of radio buttons and play around with radio buttons using JQuery on a Nintex Form.

Why it is not straight forward?
Individual radio button ids in a radio button group are defined dynamically hence difficult to capture event of a specific radio button.
Radio button group functionality is handled internally by Nintex code e.g. how to group radio buttons together in one group.

How are they rendered in a Nintex Form?
There are two ways to specify rendering of radio buttons in a Nintex Form.

1. Fixed: Rendered as Table format, in table format each radio button is rendered inside a new table row(TR).
2. Floating: Rendered as Div format, in div format each radio button is rendered inside a span tag.

To have more control client side on radio buttons I would recommend rendering them in Fixed mode that is table mode. It is also the default option in the form as well. Below screenshot shows the scenario having two groups of radio buttons giving laptop and mobile selection however, there can be only one asset type selected by the user at any given time. Since Nintex form is rendering them as separate groups independent of each other hence we need custom code to achieve this.
The first group of radio buttons shown above has rdbLaptopTypes as client id specified in the Nintex Form field and the second one has rdbMobileTypes as client id specified in the field. 
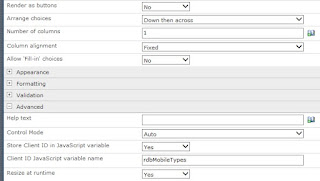
Radio button Client ID in Nintex Form

To achieve the above functionality here is the Jquery code:

$(document).ready(function(){
try
{

 var rdbLTypesCount = $('#'+ rdbLaptopTypes +'  tr').length;
 var rdbMTypesCount = $('#'+rdbMobileTypes+'  tr').length;

$('#'+rdbLaptopTypes).change(function(){                ResetRadioBtn(rdbMTypesCount, rdbMobileTypes); 
}); 

$('#'+rdbMobileTypes).change(function(){      ResetRadioBtn(rdbLTypesCount, rdbLaptopTypes); 
});

}
catch(err)
{
  if (window.console) console.log(err);
}
finally{ }
});

function ResetRadioBtn(rowCount, radioButtonName){
for(var i=0;i < rowCount; i++){
if($('#'+radioButtonName+'_'+i).is(':checked')){
$('#'+radioButtonName+'_'+i).prop('checked',false);
}
}
}

This script enables custom validation by clearing off the other group selection made by the user and is independent of the number of radio buttons rendered in each group. This code can be enhanced/altered to achieve a number of functionalities with radio buttons i.e. enable/disable other group, display a specific message on a particular option selection etc.

Another very handy generic function to capture selected value of selected radio among the list of radio buttons rendered in table format is listed below:

function GetSelectedRadioValue(rdbRadio){
var cols = $('#'+rdbRadio+'  td').length;
var rows = $('#'+rdbRadio+'  tr').length;
var radioCount =  eval((rows != 0) ? rows : 1) * eval(eval((cols != 0) ? cols : 1) / rows);

for(var i=0; i <= radioCount; i++){
if($('#'+rdbRadio+'_'+i).is(':checked')){
return $('#'+rdbRadio+'_'+i).val();
}
}
return '';
}

var selectedRadioVal =  GetSelectedRadioValue(radioButtonId);

 Hope this piece of code gives help in dealing with radio buttons on client side in Nintex Forms.

Happy coding!

Monday, October 26, 2015

How to check if user is member of an SP Group in a Nintex Workflow

There is no direct method to determine that if current user who is triggering a Nintex workflow on a list item is member of a SharePoint Group or not. In one of my recent projects I needed that functionality to differentiate set of actions based on user's group membership.A common example is that if user is member of an HR group for purpose of approval.

Achieving this is easy in a Nintex Form by using the built in method "fn-IsMemberOfGroup". This function takes one argument that is the "Group Name" and returns true or false indicating the membership status of current user for given SP group.

Getting the same functionality in Nintex Workflow is not straight forward. It requires couple of actions to achieve the same result. Here is the solution of how this can be achieved in a Nintex Workflow.

1. In Nintex Workflow designer add couple of variables to the workflow

varUserGroupResults     Multiple lines of text
currentUser                     Person or Group
varUserGroupNames      Collection
varUserMemberOfGroup Yes/No

2. Next add "Call Web Service" action and in the action set the following details as shown in the screenshot. This service call calls the usergroup.asmx web service and calls GetGroupCollectionFromUser web method to get all groups to which the user has access to.


The resulting groups are stored in varUserGroupResults in XML format.
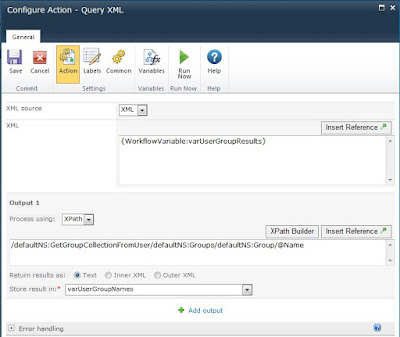
3. Now extract the group names as a collection using Query XML action. Add Query XML action to the workflow having following details

Now all the group names are in the collection and easy to iterate through.
4. Add "Collection Operation" action to the workflow to iterate through and compare the value with a group name you want to check against e.g. Approvers Group. If comparison returns true then user is part of that group else not.

The variable varUserMemberOfGroup is a boolean type which shows that whether current user is part of a specific SharePoint group or not.

There might be other ways of achieving the same result but just thought of sharing this as it took me a while to make this working.

Happy Work-flowing!!


Sunday, August 16, 2015

Nintex task form - How to redirect user to site home page rather than workflow task list

In Nintex workflows when a flexi task is assigned to any individual or a group in a an email notification informing task assignment is sent to respective user/users that a task requires an action to be performed. When a user actions that task Approves or Rejects the task, be default user is redirected to task list. User lands in the task list all items view by default after action-ing the task.

This is not a desired flow in most of the scenarios. In order to redirect user to the home page of the site after the task action is done here is a quick workaround:

Open "Assign Flexi task" in the workflow for whichever task assignment it is required. In the "Task Notification" tab click on the textarea of the notification message and select Edit HTML source from the ribbon. replace

"{Common:ApprovalUrl}" with  "{Common:ApprovalUrl}&amp;source={Common:WebUrl}"

Now SharePoint will redirect user to the home page after the task item is actioned rather than the task list.

Happy Coding!

Wednesday, June 24, 2015

How to do email validation in a Nintex Form using JQuery

Custom validations can be achieved quite easily by writing client side code in JQuery in a Nintex Form. There can be a requirement to check all mandatory fields are filled in the form or an email provided is a valid email or a number entered by user is only numeric. SharePoint allows this OOTB by defining the type of field, required or not required attribute of field but those validations happen server side on a Nintex Form. Lot of times we need to have a client side validation to inform the user then and there regarding wrong input. For example if an email needs to be validated using JQuery here are the steps to achieve this in a Nintex Form.

In Nintex Form designer drag the email field to the form from the list columns. In the control settings of the email field go to Advanced section and select "Store Client ID in JavaScript variable" as "Yes" and assign name as "txtEmail" as shown in below screenshot.


After specifying the control client JavaScript variable include the Form.js script file in the form Settings -> Advanced -> Custom JavaScript Includes

/SiteAssets/jquery-1.8.3.min.js
/SiteAssets/Form.js

Add a label control at the top of the form and set the properties of the control as shown in screenshot below. This label control will display the error message to the end user.


Set the button properties of the submit button of the form to following as shown in the screenshot so that the Validate function is called on the click of the button.

Form.js

function CheckEmailAddressIsValid(emailId) {

    var pattern = new RegExp(/^([\w-\.]+@([\w-]+\.)+[\w-]{2,4})?$/);
    return pattern.test(emailId);
};

function Validate()
{
if($('#'+txtTitle).val() == ''){
  $('.lblErrorMessage').text("Please provide title.");
  $('.lblErrorMessage').css('color', 'red');
  $('.lblErrorMessage').css('font-size', 'small');
  $('.lblErrorMessage').css('font-weight', 'bold');
  $('#'+txtTitle).css('background-color', '#FF9999');
           $('#'+txtTitle).focus();
  return false;
}
else
{
$('#'+txtTitle).css('background-color', '#FFFFFF');
}

var emailAddress = $('#'+txtEmail).val();
      if (emailAddress.trim() == '') 
      {
       $('.lblErrorMessage').text("Please provide email address.");
       $('.lblErrorMessage').css('color', 'red');
       $('.lblErrorMessage').css('font-size', 'small');
       $('.lblErrorMessage').css('font-weight', 'bold');
  
       $('#'+txtEmail).css('background-color', '#FF9999');
       $('#'+txtEmail).focus();
       return false;
   }
   else
   {
if (!CheckEmailAddressIsValid(emailAddress.trim())) {
$('.lblErrorMessage').text("Please provide a valid email address.");
$('.lblErrorMessage').css('color', 'red');
$('.lblErrorMessage').css('font-size', 'small');
$('.lblErrorMessage').css('font-weight', 'bold');
$('#'+txtEmail).css('background-color', '#FF9999');
$('#'+txtEmail).focus();
return false;
   }
  $('#'+txtEmail).css('background-color', '#FFFFFF');
   }
}

Here is the output of validation applied for email address on the Nintex Form

We can do any custom validation using this approach like numeric only, date validations or any other kind of validation.

Happy coding!

Sunday, June 21, 2015

How to populate select options or dropdown in a Nintex Form 2010 using JQuery

Lot of times in Nintex SP projects there is requirement to populate select options from a non SharePoint data source. Nintex/SharePoint provide this functionality OOTB if the type of field in the list is a lookup field looking up data from another list. However, if the data source is external then it requires a bit of client side code to populate the select options. For example if a form requires Suburbs to be populated in a select option. Here is the sample code to make this working assuming that the suburb data is coming in JSON format from any data source. It can be a REST service.

There are couple of steps required to make this working.

1. In the Nintex Form designer for the given list add a choice form control on the form. In the control settings of the choice control select "Display Format" as "Drop down list". Set "Store Client ID in Javascript variable" to "Yes" and give name e.g. ddlSuburb as shown in below screenshot. This variable will hold the reference to the rendered control on the Nintex Form.

2. Include JQuery and custom script file in the Nintex Form by going to the Form settings -> Advanced -> Custom Javascript Includes section and include following files in the form, or set the actual location of the script files.

/SiteAssets/jquery-1.8.3.min.js
/SiteAssets/Form.js

Custom JQuery Code
Form.js

$(document).ready(function () {
try
{

var data = '[{"ID": "1","Name": "Test Suburb 1"},{"ID": "2","Name": "Test Suburb 2"},{"ID": "3","Name": "Test Suburb 3"},{"ID":"4","Name": "Test Suburb 4"},{"ID": "5","Name": "Test Suburb 5"}]';

var jsonData = JSON.parse(data);
var option = '<option value="">Select Suburb</option>';
$.each(jsonData, function (k, val){
option += '<option value="' + jsonData[k].ID + '">' + jsonData[k].Name + '</option>';
});

  $('#'+ddlSuburb).find('option').remove().end().append(option);
  $('#'+ddlSuburb).change(function() { 
  $('#' + txtSuburb).val($('#'+ddlSuburb + ' :selected').text());
  //alert("You selected: " + $('#' + txtSuburb).val());
 });
}
catch(err)
{
if (window.console) console.log(err);
}
finally
{
//do something
}
});

Output
Custom Jquery code result
In this scenario the suburb data is coming from external datasource in JSON format and is getting populated in a select option in a Nintex Form. When end user selects any option then it is populated in the hidden Textbox under the Dropdown control in the form. This selected value is then saved in the list upon submit.

To select the selected option when the Nintex Form is opened in the Edit mode a CalculateValue type control can be used to get the state of the form i.e. if it is edit mode, new mode or view mode and then option can be selected by writing couple of lines as follows
if($('#' + txtSuburb).val() !== "")
{
    $('#' + ddlSuburb + ' option').each(function() {
    this.selected = $(this).text() == $('#' + txtSuburb).val();
   });
}

In extension to this code we can set cascading select options using JQuery with Nintex to make forms more usable for end users.

Happy coding!

Monday, June 15, 2015

How to integrate Nintex Form with JSON REST service using Jquery

Problem/Requirement: In one of my SharePoint project there was requirement to integrate with ATO (ABN Service) web services to validate ABN number provided by the user to be correct and in active state. User should not be able to provide inactive or expired ABN. The validation required to be done client side, before the Nintex form is submitted and sent for approval. Once the form is submitted, a workflow kicks in and the item goes for approval.

Solution: As a solution to this requirement I developed a JSON REST service which acts as a wrapper between external ATO web service and internal SharePoint Nintex Form. This REST service queries the ATO service, get the response, parses the response into an object and then return the object in JSON format to the caller, which in this case is a Nintex Form. User gets instant validation result in an interactive manner that the whether the number provided is valid or not. The benefits of using this approach are light weight data calls, quick real-time validation and ease of parsing results in JQuery.

Steps:
1. Create a WCF JSON REST service for fetching or validating the data input more detail to create such service is here.
2. Create SharePoint custom list.
3. Access the list in SharePoint and open Nintex Form designer from the ribbon control
4. Add two label controls on the form. Set the "CSS class" value to 'lblMessage' and 'lblInstruction' respectively. These will display message to the user.
5. Include following scripts in the custom JavaScript includes in the form settings. Better to keep these files in Site Assets library to refer them easily on the forms.
      jquery-1.11.1.min.js
      FormScript.js
6. Add a button on the form and set the following properties of the control in Nintex Form.

JSON

{
    "ABN": "12345678910",
    "EffectiveFrom": "27/04/1900",
    "EffectiveTo": "1/01/0001",
    "IsValid": true,
    "Status": "Active",
}

FormScript.js

var ABNValidationServiceURL = "http://xxx-xxx-xxx/ABNValidate.svc";
var abn = $('#' + txtABNNumber).val();


function ValidateABN(){

//support cross domain ajax calls
jQuery.support.cors = true;

//URL of the JSON REST service
var url = ABNValidationServiceURL + "/IsValid/" + abn;


//query ATO service for ABN

$.getJSON(url, function (atoData, status) {
  if(status == "success"){
     if(atoData["Status"] != "null" &&  atoData["Status"] == "Active"){
$('.lblMessage').show().fadeOut(4000, "linear");;
$('.lblInstruction').css('color','green');
$('.lblInstruction').css('font-size', 'small');
$('.lblInstruction').text("Please continue filling the address and bank details.").fadeOut(4000, "linear");
}
else
{
   $('.lblMessage').show(); 
$('#' + txtABNNumber).css('border','1px solid red');
$('.lblMessage').css('color','red');
$('.lblMessage').text("Please provide a valid ABN number").fadeOut(4000, "linear");
}
}
});
}
OUTPUT:

This approach has couple of benefits:

1. Data is light weight so quite fast processing.
2. Adds more usability to the form since validation is quick and done client side.
3. Straight forward access of JSON data in JQuery and cleaner JS code.

This is just an example but there can be various other ways in which JQuery can be leveraged in conjunction with Nintex Forms to make the forms more interactive, user friendly and flexible. Hope this helps.

Cheers
Happy coding!

Tuesday, May 19, 2015

How to have AppSettings like config values available in SharePoint TimerJobs

In SharePoint timer jobs there is a simple way to implement app setting like key value pairs which can be used to store configuration values. Since Timer Jobs run under SharePoint central admin context so keeping configuration values in web.config is not feasible and that too if a job is catering to multiple websites then keeping web specific configuration is also a challenge.

As a simple yet effective solution is to keep such configuration in the form of a custom list at web or site collection level, whichever is more feasible and logical to your need. Here is how I have done the same

For my requirement I need to have couple of static values and some environment specific configurations to be stored for use in a Timer job. As a solution to this I decided to keep these configurations in a custom defined list. To do that

Create a custom list and name it Config or Configuration in the web site and add one field "Value" Set the type of this field to multiple lines of text( set rich text to false.


This list will store all the configurable values e.g. environment specific server paths, list names, notification email formats, email addresses or whatever you want to store as a configuration.

After defining this list now next step is to populate the configuration values and use them in the timer job.

CustomTimerJob.cs
using System;
using System.Data;
using System.Text;
using System.Collections.Generic;
using Microsoft.SharePoint;
using Microsoft.SharePoint.Administration;
using Microsoft.Office.Server.Diagnostics;

public class MyTimerJob : SPJobDefinition
{
   private static string SERVER_NAME = "xxx-xxx-xxxx";
   private static string LIST_NAME = "Test";
   private static string WEB_NAME = "Webname";

   public override void Execute(Guid targetInstanceId)
        {
            try
            {
                SPSecurity.RunWithElevatedPrivileges(delegate()
                {
          
          SPWebApplication webApp = this.Parent as SPWebApplication;

                    //root site collection
                    string siteURL = webApp.Sites[0].Url;

                    using (SPSite site = new SPSite(siteURL))
                    {
                        using (SPWeb web = site.AllWebs[WEB_NAME])
                        {
                            //Read timer job configuration 
                            //from config list from web
                            ReadConfiguration(web);

                            SPList list = web.Lists[LIST_NAME];
                            SPQuery q = new SPQuery();

                            //Get all items to process
                            q.Query = "<Where><And><Eq><FieldRef Name='WFStatus' /><Value Type='Text'>3</Value></Eq><Eq><FieldRef Name='IsProcessed' /><Value Type='Boolean'>0</Value></Eq></And></Where><OrderBy><FieldRef Name='ID' /></OrderBy>";

            //Record collection
            SPListItemCollection itemCollection = list.GetItems(q);
                            if (itemCollection.Count > 0)
                            {
                                                                          //Write your logic here for items
                            }
                        }
                    }
                });
            }
            catch (Exception ex)
            {
                PortalLog.LogString("Exception Occurred in: {0} || {1} || {2}", " Timer Job: Execute Method", ex.Message, ex.StackTrace);
            }

        }

        /// <summary>
        /// Read configuration from config list from web.
        /// </summary>
        /// <param name="web">Web object</param>
        private static void ReadConfiguration(SPWeb web)
        {
            //Overwrite default values from configuration
            if (web != null)
            {
                SPList configList = web.Lists.TryGetList("Config");
                if (configList != null)
                {
                    foreach (SPListItem item in configList.Items)
                    {
               SERVER_NAME = GetConfigValue(item, "SERVER_NAME")!= string.Empty ? GetConfigValue(item, "SERVER_NAME") : SERVER_NAME;
               LIST_NAME = GetConfigValue(item, "LIST_NAME")!= string.Empty ? GetConfigValue(item, "LIST_NAME") : LIST_NAME;

                    }
                }
            }

        }

 /// <summary>
 /// Get config list value based on key.
 /// </summary>
 /// <param name="key">key name</param>
 /// <returns></returns>
 private static string GetConfigValue(SPListItem item, string  key)
        {
            string value = string.Empty;
            if (string.Equals(item["Title"].ToString(), key) && item["Value"] != null)
            {
                value = item["Value"].ToString();
            }
            return value;

        }
}


The above code will read the configuration values from the config list from the web. To make this config list non editable be normal users stop the inheritance level for the list and add only site collection admin or other admin user contribute access to the list and also add the farm account user under which the timer job will run to the list contribute permissions as well. When the job tried to access this list the user under which the timer job is running should have access to the list.

Having this type of configuration has key benefits of


1) Managing the config values with ease and no physical file access required like the web.config file.
2) Change in config values does not impact the AppPool or resets web application.
3) Provides more control, for example if you need to write a job to send email notifications then the email format can be kept as a config value and changed anytime without impacting code.
4) Make the job as configurable as possible so that minimal code changes are required.

Happy Coding!

Wednesday, May 13, 2015

Nintex Workflow Task Form giving error Failed to retrieve form from workflow. Error: Value cannot be null.

Issue: A strange error started coming on one of the SharePoint 2010 environment when a Nintex 2010 workflow task form is opened by the assigne, it breaks and does not open the task form. The reason is unknown but the issue is grave because none of the assigned task form works.

Detailed error stack trace is like

Area     : SharePoint FoundationCategory : GeneralEventID  : 8ncaMessage  : Application error when access /XXXX/Lists/Workflow Tasks/EditForm.aspx, Error=Value cannot be null.  Paramete           r name: s   at System.IO.StringReader..ctor(String s)     at Nintex.Workflow.WorkflowConfig2010.LoadWorkflow           Config(String configXml)     at Nintex.Workflow.Forms.ControlTemplates.TaskForm.GetWorkflowConfig()     at N           intex.Workflow.Forms.ControlTemplates.TaskForm.GetForm(String formKey, FormData formData)     at Nintex.Work           flow.Forms.ControlTemplates.TaskForm.ConfigureFiller()     at Nintex.Workflow.Forms.ControlTemplates.TaskFor           m.InitialiseForm()     at Nintex.Workflow.Forms.ControlTemplates.TaskForm.OnInit(EventArgs e)     at System.           Web.UI.Control.InitRecursive(Control namingContainer)     at System.Web.UI.Control.InitRecursive(Control nam           ingContainer)     at System.Web.UI.Control.AddedControl(Control control, Int32 index)     at Microsoft.Share           Point.WebPartPages.ListFormWebPart.CreateChildControls()     at System.Web.UI.Control.EnsureChildControls()               at Microsoft.SharePoint.WebPartPages.WebPart.get_WebPartMenu()     at Microsoft.SharePoint.WebPartPages.          ListFormWebPart.CreateWebPartMenu()     at System.Web.UI.Control.OnLoad(EventArgs e)     at Microsoft.ShareP           oint.WebPartPages.ListFormWebPart.OnLoad(EventArgs e)     at System.Web.UI.Control.LoadRecursive()     at Sy           stem.Web.UI.Control.LoadRecursive()     at System.Web.UI.Control.LoadRecursive()     at System.Web.UI.Contro           l.LoadRecursive()     at System.Web.UI.Control.LoadRecursive()     at System.Web.UI.Control.LoadRecursive()               at System.Web.UI.Page.ProcessRequestMain(Boolean includeStagesBeforeAsyncPoint, Boolean includeStagesAft           erAsyncPoint)


Resolution: In order to resolve this issue I tried saving the task form by opening the task form in the Nintex workflow and saving it, republishing the workflow couple of times but in vain. Even the ULS logs provided only the above error with no clue as to why it was breaking. I took following steps to resolve this issue:

1. Export the existing error prone workflow as a backup copy.
2. Delete the workflow from the list in the current environment.
3. Export the same workflow from another environment i.e. production.
4. Imported the exported workflow to the problematic environment and publish it.

After publishing the workflow the task forms started opening correctly and the error was gone. There was no change in list permission level, site user groups, list definition or task form. However, it might save someones time in getting around such issue.

Happy Workflow-ing :)

Sunday, April 26, 2015

How to get any user profile property value on a Nintex Form 2010 in seconds

This can be a very helpful and handy feature for getting user profile property values for logged in user on a Nintex Form for example if there is a requirement to auto populate user phone number in a field when the New form loads, or adding First Name and Last Name to a Name field automatically on load or populating user's department in a field.

To achieve this we can use the inbuilt function provided by Nintex. Here is how:

1. Drag a Calculated value on the form and double click on the control to configure.
2. Go to the Formula field and click on the function button.


3. Go to Runtime functions tab and select userProfileLookup function. First argument in this function is the user ID of the user. I have taken current user variable which contains existing user login id. Second argument is the property name "WorkPhone" Use it as shown below in the screenshot


and here is the output of this

A complete set of user profile properties can be found at MSDN. Sometimes we are in need of just one property and do not want to use lot of code to bring that value to the form. So this is a precise and cleaner way of getting those properties handy.

However, it should not be over used because every call made by this method hits the user profile service to get the requested value. I will suggest to keep these calls to minimum on your form to avoid performance bottlenecks.

Happy coding.