Recently I had to achieve custom validation for Radio button option selection among two groups of radio buttons on a Nintex Form and soon realized that radio button custom validation is not straight forward in Nintex. For example if there is a requirement to select only one option among two radio button groups or as soon as user selects one option in one group the second already selected option in other group gets cleared automatically.
So thought of writing a post that helps to explain the rendering of radio buttons and play around with radio buttons using JQuery on a Nintex Form.
Why it is not straight forward?
Individual radio button ids in a radio button group are defined dynamically hence difficult to capture event of a specific radio button.
Radio button group functionality is handled internally by Nintex code e.g. how to group radio buttons together in one group.
How are they rendered in a Nintex Form?
There are two ways to specify rendering of radio buttons in a Nintex Form.
1. Fixed: Rendered as Table format, in table format each radio button is rendered inside a new table row(TR).
2. Floating: Rendered as Div format, in div format each radio button is rendered inside a span tag.
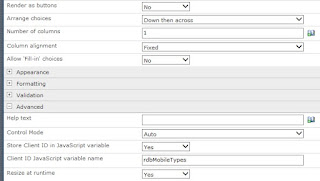
To have more control client side on radio buttons I would recommend rendering them in Fixed mode that is table mode. It is also the default option in the form as well. Below screenshot shows the scenario having two groups of radio buttons giving laptop and mobile selection however, there can be only one asset type selected by the user at any given time. Since Nintex form is rendering them as separate groups independent of each other hence we need custom code to achieve this.
 The first group of radio buttons shown above has rdbLaptopTypes as client id specified in the Nintex Form field and the second one has rdbMobileTypes as client id specified in the field.
To achieve the above functionality here is the Jquery code:
$(document).ready(function(){
try
{
var rdbLTypesCount = $('#'+ rdbLaptopTypes +' tr').length;
var rdbMTypesCount = $('#'+rdbMobileTypes+' tr').length;
$('#'+rdbLaptopTypes).change(function(){ ResetRadioBtn(rdbMTypesCount, rdbMobileTypes);
});
$('#'+rdbMobileTypes).change(function(){ ResetRadioBtn(rdbLTypesCount, rdbLaptopTypes);
});
}
catch(err)
{
if (window.console) console.log(err);
}
finally{ }
});
function ResetRadioBtn(rowCount, radioButtonName){
for(var i=0;i < rowCount; i++){
if($('#'+radioButtonName+'_'+i).is(':checked')){
$('#'+radioButtonName+'_'+i).prop('checked',false);
}
}
}
This script enables custom validation by clearing off the other group selection made by the user and is independent of the number of radio buttons rendered in each group. This code can be enhanced/altered to achieve a number of functionalities with radio buttons i.e. enable/disable other group, display a specific message on a particular option selection etc.
Another very handy generic function to capture selected value of selected radio among the list of radio buttons rendered in table format is listed below:
function GetSelectedRadioValue(rdbRadio){
var cols = $('#'+rdbRadio+' td').length;
var rows = $('#'+rdbRadio+' tr').length;
var radioCount = eval((rows != 0) ? rows : 1) * eval(eval((cols != 0) ? cols : 1) / rows);
for(var i=0; i <= radioCount; i++){
if($('#'+rdbRadio+'_'+i).is(':checked')){
return $('#'+rdbRadio+'_'+i).val();
}
}
return '';
}
var selectedRadioVal = GetSelectedRadioValue(radioButtonId);
Hope this piece of code gives help in dealing with radio buttons on client side in Nintex Forms.
Happy coding!
So thought of writing a post that helps to explain the rendering of radio buttons and play around with radio buttons using JQuery on a Nintex Form.
Why it is not straight forward?
Individual radio button ids in a radio button group are defined dynamically hence difficult to capture event of a specific radio button.
Radio button group functionality is handled internally by Nintex code e.g. how to group radio buttons together in one group.
How are they rendered in a Nintex Form?
There are two ways to specify rendering of radio buttons in a Nintex Form.
1. Fixed: Rendered as Table format, in table format each radio button is rendered inside a new table row(TR).
2. Floating: Rendered as Div format, in div format each radio button is rendered inside a span tag.
To have more control client side on radio buttons I would recommend rendering them in Fixed mode that is table mode. It is also the default option in the form as well. Below screenshot shows the scenario having two groups of radio buttons giving laptop and mobile selection however, there can be only one asset type selected by the user at any given time. Since Nintex form is rendering them as separate groups independent of each other hence we need custom code to achieve this.

To achieve the above functionality here is the Jquery code:
$(document).ready(function(){
try
{
var rdbLTypesCount = $('#'+ rdbLaptopTypes +' tr').length;
var rdbMTypesCount = $('#'+rdbMobileTypes+' tr').length;
$('#'+rdbLaptopTypes).change(function(){ ResetRadioBtn(rdbMTypesCount, rdbMobileTypes);
});
$('#'+rdbMobileTypes).change(function(){ ResetRadioBtn(rdbLTypesCount, rdbLaptopTypes);
});
}
catch(err)
{
if (window.console) console.log(err);
}
finally{ }
});
function ResetRadioBtn(rowCount, radioButtonName){
for(var i=0;i < rowCount; i++){
if($('#'+radioButtonName+'_'+i).is(':checked')){
$('#'+radioButtonName+'_'+i).prop('checked',false);
}
}
}
This script enables custom validation by clearing off the other group selection made by the user and is independent of the number of radio buttons rendered in each group. This code can be enhanced/altered to achieve a number of functionalities with radio buttons i.e. enable/disable other group, display a specific message on a particular option selection etc.
Another very handy generic function to capture selected value of selected radio among the list of radio buttons rendered in table format is listed below:
function GetSelectedRadioValue(rdbRadio){
var cols = $('#'+rdbRadio+' td').length;
var rows = $('#'+rdbRadio+' tr').length;
var radioCount = eval((rows != 0) ? rows : 1) * eval(eval((cols != 0) ? cols : 1) / rows);
for(var i=0; i <= radioCount; i++){
if($('#'+rdbRadio+'_'+i).is(':checked')){
return $('#'+rdbRadio+'_'+i).val();
}
}
return '';
}
var selectedRadioVal = GetSelectedRadioValue(radioButtonId);
Hope this piece of code gives help in dealing with radio buttons on client side in Nintex Forms.
Happy coding!


