Showing posts with label Nintex Forms 2010. Show all posts

Wednesday, December 16, 2015

How to enable radio button custom validation in Nintex Form e.g. one selection among two groups of radio buttons

Recently I had to achieve custom validation for Radio button option selection among two groups of radio buttons on a Nintex Form and soon realized that radio button custom validation is not straight forward in Nintex. For example if there is a requirement to select only one option among two radio button groups or as soon as user selects one option in one group the second already selected option in other group gets cleared automatically.

So thought of writing a post that helps to explain the rendering of radio buttons and play around with radio buttons using JQuery on a Nintex Form.

Why it is not straight forward?
Individual radio button ids in a radio button group are defined dynamically hence difficult to capture event of a specific radio button.
Radio button group functionality is handled internally by Nintex code e.g. how to group radio buttons together in one group.

How are they rendered in a Nintex Form?
There are two ways to specify rendering of radio buttons in a Nintex Form.

1. Fixed: Rendered as Table format, in table format each radio button is rendered inside a new table row(TR).
2. Floating: Rendered as Div format, in div format each radio button is rendered inside a span tag.

To have more control client side on radio buttons I would recommend rendering them in Fixed mode that is table mode. It is also the default option in the form as well. Below screenshot shows the scenario having two groups of radio buttons giving laptop and mobile selection however, there can be only one asset type selected by the user at any given time. Since Nintex form is rendering them as separate groups independent of each other hence we need custom code to achieve this.
The first group of radio buttons shown above has rdbLaptopTypes as client id specified in the Nintex Form field and the second one has rdbMobileTypes as client id specified in the field. 
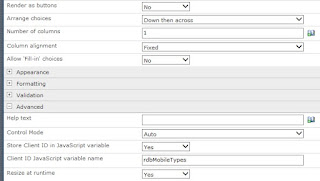
Radio button Client ID in Nintex Form

To achieve the above functionality here is the Jquery code:

$(document).ready(function(){
try
{

 var rdbLTypesCount = $('#'+ rdbLaptopTypes +'  tr').length;
 var rdbMTypesCount = $('#'+rdbMobileTypes+'  tr').length;

$('#'+rdbLaptopTypes).change(function(){                ResetRadioBtn(rdbMTypesCount, rdbMobileTypes); 
}); 

$('#'+rdbMobileTypes).change(function(){      ResetRadioBtn(rdbLTypesCount, rdbLaptopTypes); 
});

}
catch(err)
{
  if (window.console) console.log(err);
}
finally{ }
});

function ResetRadioBtn(rowCount, radioButtonName){
for(var i=0;i < rowCount; i++){
if($('#'+radioButtonName+'_'+i).is(':checked')){
$('#'+radioButtonName+'_'+i).prop('checked',false);
}
}
}

This script enables custom validation by clearing off the other group selection made by the user and is independent of the number of radio buttons rendered in each group. This code can be enhanced/altered to achieve a number of functionalities with radio buttons i.e. enable/disable other group, display a specific message on a particular option selection etc.

Another very handy generic function to capture selected value of selected radio among the list of radio buttons rendered in table format is listed below:

function GetSelectedRadioValue(rdbRadio){
var cols = $('#'+rdbRadio+'  td').length;
var rows = $('#'+rdbRadio+'  tr').length;
var radioCount =  eval((rows != 0) ? rows : 1) * eval(eval((cols != 0) ? cols : 1) / rows);

for(var i=0; i <= radioCount; i++){
if($('#'+rdbRadio+'_'+i).is(':checked')){
return $('#'+rdbRadio+'_'+i).val();
}
}
return '';
}

var selectedRadioVal =  GetSelectedRadioValue(radioButtonId);

 Hope this piece of code gives help in dealing with radio buttons on client side in Nintex Forms.

Happy coding!

Wednesday, June 24, 2015

How to do email validation in a Nintex Form using JQuery

Custom validations can be achieved quite easily by writing client side code in JQuery in a Nintex Form. There can be a requirement to check all mandatory fields are filled in the form or an email provided is a valid email or a number entered by user is only numeric. SharePoint allows this OOTB by defining the type of field, required or not required attribute of field but those validations happen server side on a Nintex Form. Lot of times we need to have a client side validation to inform the user then and there regarding wrong input. For example if an email needs to be validated using JQuery here are the steps to achieve this in a Nintex Form.

In Nintex Form designer drag the email field to the form from the list columns. In the control settings of the email field go to Advanced section and select "Store Client ID in JavaScript variable" as "Yes" and assign name as "txtEmail" as shown in below screenshot.


After specifying the control client JavaScript variable include the Form.js script file in the form Settings -> Advanced -> Custom JavaScript Includes

/SiteAssets/jquery-1.8.3.min.js
/SiteAssets/Form.js

Add a label control at the top of the form and set the properties of the control as shown in screenshot below. This label control will display the error message to the end user.


Set the button properties of the submit button of the form to following as shown in the screenshot so that the Validate function is called on the click of the button.

Form.js

function CheckEmailAddressIsValid(emailId) {

    var pattern = new RegExp(/^([\w-\.]+@([\w-]+\.)+[\w-]{2,4})?$/);
    return pattern.test(emailId);
};

function Validate()
{
if($('#'+txtTitle).val() == ''){
  $('.lblErrorMessage').text("Please provide title.");
  $('.lblErrorMessage').css('color', 'red');
  $('.lblErrorMessage').css('font-size', 'small');
  $('.lblErrorMessage').css('font-weight', 'bold');
  $('#'+txtTitle).css('background-color', '#FF9999');
           $('#'+txtTitle).focus();
  return false;
}
else
{
$('#'+txtTitle).css('background-color', '#FFFFFF');
}

var emailAddress = $('#'+txtEmail).val();
      if (emailAddress.trim() == '') 
      {
       $('.lblErrorMessage').text("Please provide email address.");
       $('.lblErrorMessage').css('color', 'red');
       $('.lblErrorMessage').css('font-size', 'small');
       $('.lblErrorMessage').css('font-weight', 'bold');
  
       $('#'+txtEmail).css('background-color', '#FF9999');
       $('#'+txtEmail).focus();
       return false;
   }
   else
   {
if (!CheckEmailAddressIsValid(emailAddress.trim())) {
$('.lblErrorMessage').text("Please provide a valid email address.");
$('.lblErrorMessage').css('color', 'red');
$('.lblErrorMessage').css('font-size', 'small');
$('.lblErrorMessage').css('font-weight', 'bold');
$('#'+txtEmail).css('background-color', '#FF9999');
$('#'+txtEmail).focus();
return false;
   }
  $('#'+txtEmail).css('background-color', '#FFFFFF');
   }
}

Here is the output of validation applied for email address on the Nintex Form

We can do any custom validation using this approach like numeric only, date validations or any other kind of validation.

Happy coding!

Sunday, June 21, 2015

How to populate select options or dropdown in a Nintex Form 2010 using JQuery

Lot of times in Nintex SP projects there is requirement to populate select options from a non SharePoint data source. Nintex/SharePoint provide this functionality OOTB if the type of field in the list is a lookup field looking up data from another list. However, if the data source is external then it requires a bit of client side code to populate the select options. For example if a form requires Suburbs to be populated in a select option. Here is the sample code to make this working assuming that the suburb data is coming in JSON format from any data source. It can be a REST service.

There are couple of steps required to make this working.

1. In the Nintex Form designer for the given list add a choice form control on the form. In the control settings of the choice control select "Display Format" as "Drop down list". Set "Store Client ID in Javascript variable" to "Yes" and give name e.g. ddlSuburb as shown in below screenshot. This variable will hold the reference to the rendered control on the Nintex Form.

2. Include JQuery and custom script file in the Nintex Form by going to the Form settings -> Advanced -> Custom Javascript Includes section and include following files in the form, or set the actual location of the script files.

/SiteAssets/jquery-1.8.3.min.js
/SiteAssets/Form.js

Custom JQuery Code
Form.js

$(document).ready(function () {
try
{

var data = '[{"ID": "1","Name": "Test Suburb 1"},{"ID": "2","Name": "Test Suburb 2"},{"ID": "3","Name": "Test Suburb 3"},{"ID":"4","Name": "Test Suburb 4"},{"ID": "5","Name": "Test Suburb 5"}]';

var jsonData = JSON.parse(data);
var option = '<option value="">Select Suburb</option>';
$.each(jsonData, function (k, val){
option += '<option value="' + jsonData[k].ID + '">' + jsonData[k].Name + '</option>';
});

  $('#'+ddlSuburb).find('option').remove().end().append(option);
  $('#'+ddlSuburb).change(function() { 
  $('#' + txtSuburb).val($('#'+ddlSuburb + ' :selected').text());
  //alert("You selected: " + $('#' + txtSuburb).val());
 });
}
catch(err)
{
if (window.console) console.log(err);
}
finally
{
//do something
}
});

Output
Custom Jquery code result
In this scenario the suburb data is coming from external datasource in JSON format and is getting populated in a select option in a Nintex Form. When end user selects any option then it is populated in the hidden Textbox under the Dropdown control in the form. This selected value is then saved in the list upon submit.

To select the selected option when the Nintex Form is opened in the Edit mode a CalculateValue type control can be used to get the state of the form i.e. if it is edit mode, new mode or view mode and then option can be selected by writing couple of lines as follows
if($('#' + txtSuburb).val() !== "")
{
    $('#' + ddlSuburb + ' option').each(function() {
    this.selected = $(this).text() == $('#' + txtSuburb).val();
   });
}

In extension to this code we can set cascading select options using JQuery with Nintex to make forms more usable for end users.

Happy coding!

Monday, June 15, 2015

How to integrate Nintex Form with JSON REST service using Jquery

Problem/Requirement: In one of my SharePoint project there was requirement to integrate with ATO (ABN Service) web services to validate ABN number provided by the user to be correct and in active state. User should not be able to provide inactive or expired ABN. The validation required to be done client side, before the Nintex form is submitted and sent for approval. Once the form is submitted, a workflow kicks in and the item goes for approval.

Solution: As a solution to this requirement I developed a JSON REST service which acts as a wrapper between external ATO web service and internal SharePoint Nintex Form. This REST service queries the ATO service, get the response, parses the response into an object and then return the object in JSON format to the caller, which in this case is a Nintex Form. User gets instant validation result in an interactive manner that the whether the number provided is valid or not. The benefits of using this approach are light weight data calls, quick real-time validation and ease of parsing results in JQuery.

Steps:
1. Create a WCF JSON REST service for fetching or validating the data input more detail to create such service is here.
2. Create SharePoint custom list.
3. Access the list in SharePoint and open Nintex Form designer from the ribbon control
4. Add two label controls on the form. Set the "CSS class" value to 'lblMessage' and 'lblInstruction' respectively. These will display message to the user.
5. Include following scripts in the custom JavaScript includes in the form settings. Better to keep these files in Site Assets library to refer them easily on the forms.
      jquery-1.11.1.min.js
      FormScript.js
6. Add a button on the form and set the following properties of the control in Nintex Form.

JSON

{
    "ABN": "12345678910",
    "EffectiveFrom": "27/04/1900",
    "EffectiveTo": "1/01/0001",
    "IsValid": true,
    "Status": "Active",
}

FormScript.js

var ABNValidationServiceURL = "http://xxx-xxx-xxx/ABNValidate.svc";
var abn = $('#' + txtABNNumber).val();


function ValidateABN(){

//support cross domain ajax calls
jQuery.support.cors = true;

//URL of the JSON REST service
var url = ABNValidationServiceURL + "/IsValid/" + abn;


//query ATO service for ABN

$.getJSON(url, function (atoData, status) {
  if(status == "success"){
     if(atoData["Status"] != "null" &&  atoData["Status"] == "Active"){
$('.lblMessage').show().fadeOut(4000, "linear");;
$('.lblInstruction').css('color','green');
$('.lblInstruction').css('font-size', 'small');
$('.lblInstruction').text("Please continue filling the address and bank details.").fadeOut(4000, "linear");
}
else
{
   $('.lblMessage').show(); 
$('#' + txtABNNumber).css('border','1px solid red');
$('.lblMessage').css('color','red');
$('.lblMessage').text("Please provide a valid ABN number").fadeOut(4000, "linear");
}
}
});
}
OUTPUT:

This approach has couple of benefits:

1. Data is light weight so quite fast processing.
2. Adds more usability to the form since validation is quick and done client side.
3. Straight forward access of JSON data in JQuery and cleaner JS code.

This is just an example but there can be various other ways in which JQuery can be leveraged in conjunction with Nintex Forms to make the forms more interactive, user friendly and flexible. Hope this helps.

Cheers
Happy coding!

Sunday, April 26, 2015

How to get any user profile property value on a Nintex Form 2010 in seconds

This can be a very helpful and handy feature for getting user profile property values for logged in user on a Nintex Form for example if there is a requirement to auto populate user phone number in a field when the New form loads, or adding First Name and Last Name to a Name field automatically on load or populating user's department in a field.

To achieve this we can use the inbuilt function provided by Nintex. Here is how:

1. Drag a Calculated value on the form and double click on the control to configure.
2. Go to the Formula field and click on the function button.


3. Go to Runtime functions tab and select userProfileLookup function. First argument in this function is the user ID of the user. I have taken current user variable which contains existing user login id. Second argument is the property name "WorkPhone" Use it as shown below in the screenshot


and here is the output of this

A complete set of user profile properties can be found at MSDN. Sometimes we are in need of just one property and do not want to use lot of code to bring that value to the form. So this is a precise and cleaner way of getting those properties handy.

However, it should not be over used because every call made by this method hits the user profile service to get the requested value. I will suggest to keep these calls to minimum on your form to avoid performance bottlenecks.

Happy coding.

Tuesday, September 30, 2014

How to make attachment mandatory in Nintex Form in SharePoint 2010

Lot of times we have requirement to make attachments to a form mandatory in a SharePoint list form. This validation is not available out of the box, although can be achieved very easily by using JQuery. Here is how.
Define the following function in a custom JavaScript file i.e. Validate.js. Include the JQuery and custom validate.js file in Nintex form in the order shown in the below screenshot.


function ValidateForm()
{
//attachment check
if($('.nf-attachmentstable tr').length < 1){
alert("Please attach a file"); 
return false;
}
}


On the submit button set the following as client function:


Here is the result.

Hope this snippet is useful to apply attachment validation in Nintex Forms. Happy coding :)